Severe storms, hurricanes, and strong gusts can lift, curl, or even tear away your roof shingles. These winds can cause significant harm to your roof, leading to expensive repairs when the problems are not tackled. As such, detecting wind damage as early as possible is essential for maintaining the integrity of your roof.
On this page, you can learn how to spot wind damage on roof shingles, understand the different types of damage, and how to perform some quick fixes. We will cover everything from initial exterior inspections to sharing detailed steps for addressing wind damage. Let’s get started!
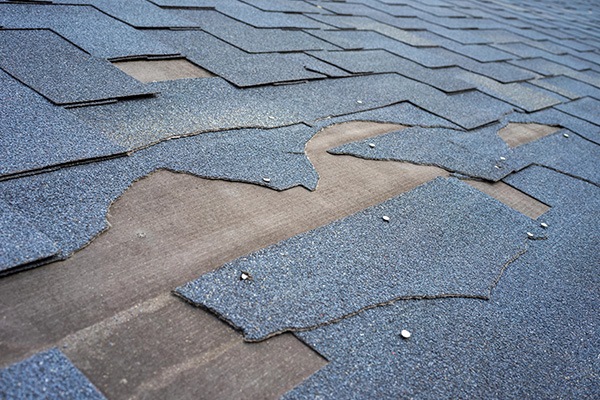
Types of Wind Damage to Roof Shingles
Wind can impact roof shingles in multiple ways, causing visible and hidden damage that compromises the roof’s functionality. High winds exert pressure on shingles, especially at the edges, leading to several types of damage:
- Lifting and Curling
One common issue is lifting and curling. Wind can get underneath the shingles, causing them to lift and curl at the edges. This exposure can allow water to seep underneath, leading to leaks and further damage.
- Missing Shingles
Another type of wind damage is missing shingles. Strong gusts can completely tear off shingles, leaving parts of your roof exposed to the elements.
- Granule Loss
Granule loss is another subtle but significant kind of damage. Shingles are coated with granules to protect them from UV rays and enhance durability. Wind can strip these granules away, weakening the shingles and reducing their lifespan.
- Cracked or Broken Shingles
Lastly, cracked or broken shingles are also victims of wind damage. Shingles can crack or break when subjected to high winds, making them less effective at protecting your home.
Initial Exterior Inspections
Before inspecting your roof for wind damage, don’t forget to prioritize your safety. Never attempt to inspect your roof during or immediately after a storm.
Wait for calm weather and ensure you have the right tools and equipment. Basic tools for a safe inspection include binoculars, a sturdy ladder, and a camera for documenting any damage.
From the ground, you should be able to spot several traces of wind damage. Use binoculars to get a close look at the roof without climbing up.
Look for visible gaps or lifted shingles, which indicate that wind has loosened them. Discoloration patches can also be a sign of granule loss, where shingles appear bare and less textured than the surrounding area.
Check the edges of the roof, as wind damage often starts there. Also, look for any debris, like branches or leaves, that might have impacted the roof during the storm.
Detailed Roof Inspection
Conducting a thorough roof inspection up close is necessary to identify wind damage that might not be visible from the ground. Ensure you wear appropriate safety gear, including non-slip shoes and a harness if necessary. If you’re not comfortable with heights, consider hiring a professional.
Begin your inspection at the roof edges and corners. These areas are most vulnerable to wind, and you may notice shingles that are loose, curling, or completely missing.
Wobbly and absent shingles are the most obvious signs of wind damage. Lifted shingles may still be in place but are not secure and can lead to further issues if not addressed.
Ridge caps and valleys also require close attention. The wind can easily move the shingles in these spots, exposing the underlayment or roofing felt beneath. Exposed underlayment or roofing felt indicates that the shingles above have been dislodged or damaged, which can lead to water infiltration and subsequent damage.
Take your time to inspect each section of the roof. This detailed inspection will provide a comprehensive understanding of the roof’s condition and help you decide on the necessary repairs or whether professional intervention is needed.
Inspecting Interior Spaces for Secondary Damage
Inspecting your roof and interior areas for secondary damage is just as important as looking for direct wind damage. Winds can create openings that enable water and debris to penetrate the roof, resulting in a host of cascading problems inside your home.
Checking your interior spaces will help identify and mitigate these issues early and prevent pricey repairs down the line. Start with the attic, as it’s the first place where signs of roof damage might appear. Use a flashlight to carefully scrutinize the entire attic space.
Search for water discolorations on the underside of the roof decking and check for any signs of moisture or leaks. Even small stains can signify a leak that needs to be dealt with, as minor leaks become huge if left unattended.
Next, examine the ceilings and walls throughout your home. Look for stains, bubbling paint, or peeling wallpaper, as these are clear indicators of water ingress. Check around the light fixtures and ceiling fans, as water often finds its way through these openings.
Damp insulation is another telltale sign of roof leaks. If you notice wet or compressed insulation, it’s essential to address the underlying water infiltration issue straightaway. Wet insulation loses its effectiveness and can bring about increased energy bills and further damage to the roof structure.
Mold and mildew are also common concerns following wind damage, as moisture from leaks creates an ideal environment for their growth. Look for mold in the attic and other dark, damp areas. The presence of mold not only damages your infrastructure but can also pose health risks.
Structural damage might be less obvious but equally serious. Inspect for sagging rooflines, cracks in the walls or ceiling, and any unusual movements in the roof structure. These signs could indicate that the wind has compromised the roof’s integrity, requiring immediate professional attention.
Documenting the Damage
Thorough documentation of roof damage is important for both insurance claims and planning repairs. Accurate records ensure that you have a clear understanding of the extent of the damage and can communicate effectively with insurance adjusters and contractors.
Start by taking clear photographs of all damaged areas. Use a high-resolution camera or a smartphone with a good camera to capture detailed images. Take multiple photos from different angles to get a 360° view of each damaged spot.
Include close-ups to show specific issues, such as lifted shingles, missing granules, or exposed underlayment, and wide shots to give context to the damage. Make sure your photos are well-lit and focused.
In addition to photographs, keep a detailed written record of all the damage. Note the location of each issue, the type of damage observed, and any additional observations that might be relevant. Keeping a log of the date and time of each inspection can also be helpful, as it provides a timeline of the damage and any changes over time.
Organize your documentation in a way that makes it easy to reference. Create a digital folder on your computer or cloud storage service to store all photos and notes.
Label each file with descriptive names to quickly identify the content. This organized approach will streamline the process of filing insurance claims and coordinating repairs, making sure that nothing is overlooked.
Temporary Repairs
When you spot wind damage on your roof, taking immediate action with temporary repairs is essential to prevent further deterioration. Quick fixes can halt water infiltration and other issues until permanent repairs can be made.
First, gather the necessary materials for temporary repairs. You will need roofing cement, cloths, tarps, as well as nail or adhesive strips.
Roofing cement is useful for sealing small cracks and securing loose shingles, while tarps can cover larger exposed areas to prevent water from entering your home. Nail and adhesive strips help to hold down loose materials temporarily.
Begin by securing any loose shingles. Apply a generous amount of roofing cement under the loose edge of each shingle and press it back into place. Hold it down for a few moments to ensure it adheres properly.
If you have missing shingles, use a smaller cloth or sheet to cover the exposed area. Affix the cloth or sheet with glue strips or nails, making certain that it is tightly fastened to withstand wind and rain.
For bigger damaged sections, cover the area with a large tarp, ensuring that it extends beyond the damaged portion. Secure the edges of the tarp with roofing nails or heavy-duty adhesive strips. If possible, weigh down the tarp with bricks or heavy objects to keep it in place during adverse weather conditions.
These temporary repairs are not a substitute for professional roofing work but can prevent immediate problems while you arrange for permanent solutions.
Fix Wind-Damaged Roof Shingles with Harvey’s Five Star Roofing
To avoid having wind-torn roof shingles, remember to conduct regular inspections, both exterior and interior, to rectify any potential issues promptly. Carrying out certain temporary fixes can mitigate the damage, but be sure to follow up with professional assessment and permanent solutions.
Should you need any assistance, the seasoned specialists at Harvey’s Five Star Roofing are always ready to aid you in your roofing repairs and re-roofing needs. Our professional roofing solutions can help extend your roof’s lifespan and give you a safe and secure home interior again. Check out our portfolio of recent projects and see how our first-rate materials and service can serve you, all at an affordable rate.