Damaged or missing shingles on your roof can be a concern, but addressing them doesn’t have to be complicated. With proper guidance, fixing shingles can be a manageable task. Whether the damage is due to a recent storm, normal aging, or an unexpected leak, acting swiftly can help you avoid larger issues later. Let’s walk through the steps needed to repair shingles and keep your roof in great shape.
Why Fixing Shingles Matters
Fixing shingles promptly is key to maintaining the health of your roof and the safety of your home. Damaged shingles can lead to leaks, which may result in water damage to your attic, walls, and even your home’s foundation. By addressing the issue early, you not only extend the life of your roof but also prevent costly repairs in the future.
Inspect Your Roof Safely
Before you start fixing shingles, it’s important to thoroughly assess the damage. Grab a pair of binoculars and inspect your roof from the ground. Look for missing, curled, or cracked shingles. If you’re comfortable and the roof isn’t too steep, you can climb up with a ladder to get a closer look. Make sure you’re equipped with non-slip shoes and always prioritize safety.
Carefully Remove Shingles
To remove a damaged shingle, start by lifting the shingles above it to access the nails holding it in place. Use a pry bar to gently lift the nails and remove them. Be careful not to damage the surrounding shingles as you work. If the shingle is still intact but curled, you may just need to flatten it back into place using roofing cement.
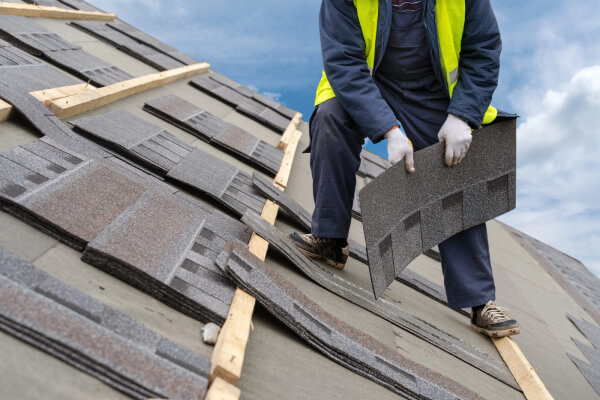
Position the Replacement Shingle
Slide the new shingle into place, aligning it with the surrounding shingles. Make sure it sits evenly with the others and that the pattern remains consistent. This approach creates a solid seal while preserving the uniform appearance of your roof.
Nail It Down
Once the new shingle is positioned correctly, use roofing nails to secure it. Place the nails in the same spots as the original shingle to ensure it stays firmly in place. Make sure to nail just above the shingle tab and not through it, which could cause leaks.
Seal the Edges
Apply a small amount of roofing adhesive or cement under each corner of the new shingle and press down to create a
Do a Quick Roof Walkaround
While you’re fixing shingles, it’s a good idea to check for any other loose or damaged shingles. Give the roof a quick once-over and re-secure any shingles that look like they might be lifting. It’s much easier to do it all in one go than to keep coming back for multiple repairs.
Tidy Up Your Work Area
Once you’ve completed the repair, make sure to clean up any leftover debris, nails, or old shingles. Dispose of old materials properly, as they can be hazardous to both you and your landscaping.
Maintaining a Strong, Secure Roof
While fixing shingles can be a manageable task for many homeowners, some situations call for professional help. If you’re dealing with extensive damage, multiple missing shingles, or you’re simply not comfortable working on your roof, don’t hesitate to contact a professional roofing company. We’re here to help with any roofing needs you might have, big or small.
Fixing shingles doesn’t have to be a daunting task. With a little preparation, the right tools, and a careful approach, you can handle minor repairs yourself and keep your roof in great shape. Remember, if you’re ever unsure or uncomfortable, we’re just a call away to provide professional guidance and support. Keep your roof in top condition, and it will keep protecting your home for years to come!